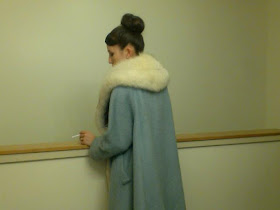
So... I didn't get the 1840s dress done for the event last weekend, but that's okay! It will be shiny and new for Costume College, and I'll be all set for the 1840s event NEXT year!
In the meantime, I have a bunch of finished projects that need to be shared! Mostly Teslacon and a couple things I made in October. The theme for Teslacon this year was Wild West, and I was really inspired by Annie Oakley's cute outfits and others like hers. Short skirts, fringe, etc. I came up with "Steampunk vivandiere goes West" as one of my outfits. It's made from teal wool from Burnley and Trowbridge with hand-cut deerskin fringe. The outfit consists of an underskirt, overskirt, Swiss waist, blouse, and jacket. I actually thrifted the blouse because... why not! It was perfect for the outfit and saved me a lot of time. Plus it goes perfectly with a 1940s Western outfit that's been sitting in my closet for a couple years. I was going for an 1860s silhouette, and I think it turned out okay. I cut down an old cage crinoline but I'm not completely happy with the shape. Starting a cage from scratch would have been better but I just didn't have time! This was the first outfit that I could really have fun accessorizing. It just begged for goggles, and for once, goggles seemed totally appropriate! It's very sandy in the West, you know. ;-) I also got an old ammo container and I snagged Michael's hat. Michael Steampunk'd my barrel, which was just awesome and got so many compliments. He's so creative! It really lights up!
a
Sunday, December 20, 2015
Sunday, December 6, 2015
Early 1840s Bonnet
This bonnet is for a c. 1842 outfit that I'm suddenly working on! It's mostly for Costume College, but there is also a small 1840s event a week from today that I will hopefully have it finished for! At least I hope to have the gown wearable, even if it doesn't have all the trim.
The bonnet form is from Timely Tresses, and I covered it using their pattern. I decided to pipe the tip of the bonnet and do a bias binding on the front edge for added interest. After looking at dozens of original bonnets and fashion plates, and playing around with my silk satin ribbon and velvet flowers, I came up with this trim design.
The pink silk is sarsenet from Burnley and Trowbridge. The ribbon and flowers are vintage pieces from an antique store in Michigan. I bought them without a project in mind but knew they'd come in handy eventually!
Now on to the gown!
The curtain is gauged after this original bonnet.
Bonnet insides are rarely a thing of beauty... Silk taffeta brim facing and a cotton "head liner".
Saturday, November 28, 2015
We're Having an Historic Clothing Conference!!!
In what is undoubtedly the most ambitious project of my fledgling museum career, I have been organizing what I hope will be an amazing conference next June 24-26! Check out the details below. Registration opens December 1 and is limited to 72 participants! I will let everyone know when the webpage has been updated with the link to buy tickets.
http://www.historyisfun.org/learn/homeschool-scouts/historic-clothing-conference/
Come to Jamestown Settlement for a weekend focused on the study and recreation of late 16th and early 17th century clothing. “Tailored to a New World” brings together The Tudor Tailor team from England and historical clothing scholars from around the United States for a truly unique learning experience that combines hands-on workshops with traditional lectures. Participants will also enjoy field trips, behind-the-scenes tours, and an evening reception in the recreated James Fort.
Tickets are $300. Registration is limited to 72 participants and includes:
*Four hands-on workshops with The Tudor Tailor
*A special presentation by The Tudor Tailor followed by a question and answer session and the opportunity to examine recreated garments, take photos, and buy from The Tudor Tailor shop
*A private archaeological tour of clothing-related artifacts from Jamestown Rediscovery at Historic Jamestowne
*A behind-the-scenes tour of Jamestown Settlement’s costume shop, highlighting the role of historic clothing in the museum’s living history interpretive areas
*An exclusive embroidery pattern taken from a blackwork coif circa 1600 in the collections of Jamestown Settlement
*An evening reception where participants are encouraged to wear their finest historical clothing and enjoy food and period music in the recreated James Fort
*Boxed lunches and refreshments between workshops and lectures
Jamestown Settlement is pleased to welcome Brenda Rosseau (Costume Design Center, Colonial Williamsburg), Daniel Rosen (Old England Grown New), Mathew Gnagy (The Modern Maker), Noel Gieleghem, Bly Straube (Independent Archaeological Curator and Material Culture Specialist), Mark Hutter (Historic Trades, Colonial Williamsburg), Neal Hurst (Museum of the American Revolution), and Samantha McCarty (Jamestown-Yorktown Foundation) as speakers.
Saturday, November 7, 2015
Costume College 2016 or Bust!
I am very honored to announce that I have received a scholarship to Costume College and will be attending next year! And hopefully teaching, if I figure out what I should teach... (suggestions welcome!). This scholarship is SO helpful and made all the difference in my being able to attend. I'm really looking forward to seeing everyone next year!
Of course in terms of what to wear, I already have some ideas... :)
1. Felicity--at last! Maybe for the Gala, but I may also wear...
2. 1610s silk gown: we are having a big to-be-announced event at work next June, and I'd like to finally have an elite 1610s gown to wear for that
3. Jane Eyre 1840s black silk gown: to be made from the gazillion yards of $5 black silk taffeta we bought last year! In the book, Jane wears a black silk gown for her first (official) meeting with Rochester. She mentions she changes from a black stuff (wool) gown into a black silk gown for the occasion, her only other gown besides a gray silk that she feels is too nice to wear.
4. Probably something 18th century... I should finish the polonaise jacket I started in the B&T workshop! Although that seems sort of boring... :-P
5. Tightrope walker: for Friday ice cream social, although I may change my mind on this one and save it for Halloween... I'll have to see how these other projects work out!
Monday, November 2, 2015
Late 16th-Early 17th Century Waistcoat
I FINALLY was able to get pictures of the whole outfit! I'll take detail shots of the garments themselves, but I'm stuck at the Atlanta airport and thought that now was as good a time as any to write this post. :)
The waistcoat pattern is based on The Tudor Tailor, altered slightly to fit me better. It is made of white wool flannel from Renaissance Fabrics and lined with natural linen from Burnley and Trowbridge. It closes with brass hooks and eyes also from Burnley and Trowbridge.
I also made a linen partlet to wear over the petticoat and under the waistcoat, and linen cuffs for the sleeves. The coif and forehead cloth are also new, but not terribly exciting!
I had to play around a lot with the fit of the waistcoat, even painstakingly letting out the center front edges 1/4" on each side so that it would fit PERFECTLY. But I'm a little crazy like that... And very pleased with the effort. When I take detail shots at home, I'll go over my construction choices a bit.
There's also a new apron, made of a wool from Burnley and Trowbridge. It's the "dog ear" (my term) style apron, which is just a plain rectangle with ties. This is quite practical because it's easier to fold up or iron without gathers in the waistband. There are only paintings to go by, so it's hard to tell how the ties are attached. In some places it looks like the tie goes all the way across the apron, and in others it doesn't. I chose just to stitch the ties on either side of the apron, letting the "dog ears" flap free. It was the simplest choice, and the most economical in terms of tape usage.
Anyway, here are pictures! I'm wearing a pair of the American Duchess "Virginias". They are SO comfy! Go buy them!
Thursday, October 1, 2015
Ruff Stuff
I'm sorry, I just couldn't help myself. I blame the punny title on ktlovely.
I managed to finish ALMOST everything I wanted done for this event! The only thing I didn't get to do was cut down the neckline of my smock from a high neck with neckband to a low square neck so that it could be worn with my new partlet. I ran out of time for that and just wore my 18th c shift and never took off my waistcoat!
I've been meaning to do a blog post on the finished waistcoat, partlet, and cuffs, but have had no time--and no cooperating weather!--to take good pictures.
What I do have pictures of are the ruff I made fully starched and ironed in the period manner! I demonstrated ruff making and setting for the event and it was so much fun. Visitors and other reenactors were just fascinated by the process. It IS a really cool process, and one you don't get to see very often.
16th and 17th century ruffs are works of art and craftsmanship... They require the finest hand sewing you can muster with rolled hems and stroked gathers (I had to gather 176" of fabric into a 12" neckband...), and then they require skill in starching and ironing. There are no wires, pins, or anything else keeping the ruff in this shape... Just starch and a hot iron!
I must give props to my ruff mentor, Noel, for being an all-around awesome human being and providing me not only with this incredible linen but also let me borrow his poking sticks and sent me wheat starch for the event.
The wheat starch is mixed with water, boiled to thicken it, and then worked into the linen. Once the linen has dried a little bit--you want it damp, but not soaking), it's time to "set" the ruff. I chose to set the ruff in big "setts" (the figure eights) so it would be appropriate for the late 16th/early 17th c. I think I rather look like the lady in the woodcut below!
Anyway, I am so happy with this ruff, although I will be putting it on a new neckband eventually. There are examples of ruffs set on neckbands of slightly coarser material, and I think doing that on my ruff would help it stand up even more!
So here's some ruff pictures, and hopefully I'll get pictures of my whole outfit soon... After the hurricane... :-P
Friday, August 28, 2015
Lilli Ann Fox Fur Coat for Sale!
Sunday, August 23, 2015
Elizabethan-Early Jacobean Petticoat: Not Your Mama's Corset
Probably a waistcoat worn over a petticoat.
One thing that is clear--or I should say, has become clear in the past few years--is that most women in the Elizabethan period probably did not wear a separate boned garment under their gowns, at least until the very end of the century (and then by mainly fashionable women--well get into that later!). I know, I know. If you made an outfit for a Renaissance faire in the past 20... 30 years, you probably made a boned corset for your outfit. I did! But current research now suggests that this probably was not the most likely garment for women to be wearing in this period. It's probably more common for a woman to wear a petticoat and/or kirtle consisting of a bodice attached to a skirt (we'll get into petticoat vs. kirtle later as well!). The bodice--often called "upperbodies" or "bodies" in period document--most likely did not rely on boning for support and shape in the way that boning is used later in the 17th century and on into the 18th and 19th centuries. Instead, layers of padstitched canvas and buckram and a proper fit could provide support for the female figure. It's certainly possible that other forms of stiffening were being used, perhaps bents (dried sea grass), pasteboard, or cording, since we see them in other applications like whalebone and bents in the large "farthingale" sleeves of the 1590s.
Today we associate "petticoat" with just a skirt, but for Elizabethan women it most likely had an attached bodice. In the written record, authors specifically mention when petticoats are "without bodies" instead of the other way around. Even though the bodies and skirt were attached, wardrobe accounts and tailors bills often talk about making the pieces separately, or enlarging or making new bodies as a woman's body changed. Bodies and skirt did not have to be of the same fabric. For example, clothing was provided for the poor of Ipswich, and this entry mentions canvas for the bodies of petticoats:
"More, payde for ii yardes iii qtrs. of canves for iii upper bodies for iii of the grete wenches' petticottes and for the strengthening of ther wastcottes, at xd. per yarde iis iiid"
The woman in the middle of the painting with her back to us wear a petticoat with a brown bodice and red skirt. Red was an extremely common color for petticoats (but that's a discussion for another day!).
Kirtles could also feature expensive fabric for the parts that would show and cheaper fabric for those that would not. Now let's discuss petticoat vs. kirtle. They both seem to consist of a bodice and skirt. The bodices may or may not have been the support layer. I mean to say that if you had a supportive petticoat, your kirtle didn't need to be supportive as well--or vice versa. If your kirtle bodies are supportive, your petticoat doesn't need a supportive bodice. The Tudor Tailor by Jane Malcolm-Davies and Ninya Mikhaila puts the issue of petticoat vs. kirtle better than I ever could, so I will quote from them directly:
"A woman's outer clothes consisted of various combinations of petticoat, kirtle, gown, and jacket. Which of these she wore, and how many of them at one time, depended on her rank, the weather, the occasion, and the gradual evolution of fahsion through the century." (Mikhaila and Malcom-Davies, pg. 20)
"The garment worn by all women over the smock consisted of a fitted bodice with attached skirt. In the early Tudor period, this was called a kirtle. By the 1550s, the word 'petticoat' was being used to describe this item of clohthing and 'kirtle' referred to a garment that was worn over, or instead of, a petticoat by wealthier, more fashionable women."(Mikhaila and Malcolm-Davies, pg 64)
The last page of Kimiko's article quotes an online discussion with Ninya Mikhaila further elaborating the evolution of petticoat and kirtle terminology.
There are paintings of women in the early 17th century, just about all Flemish, working in kitchens with bodies that clearly have stitching lines to possibly hold some kind of boning. It's been pointed out in discussions in the Elizabethan Costuming group on Facebook (a really excellent community, by the way! Lots of very knowledgeable and kind folks) that these are often allegorical paintings. And many of the women are also wearing pretty fashionable neckwear which doesn't seem terribly practical for doing kitchen work! I do want to acknowledge those images, although I don't feel they are the norm for common women of the period. That is of course not to say that lower and middle class women couldn't have had such a garment, but it seems less likely than their having a petticoat or kirtle.
Other lovely folks have written some great stuff on this subject, so I will post links to their work at this time:
http://www.elizabethancostume.net/petticoat.html
https://www.facebook.com/media/set/?set=a.953475971345501.1073741850.697208360305598&type=3
If you want more primary accounts describing petticoats, search "petticoat bodies" in the killer Elizabethan wardrobe account database!
And please check out the amazing people at The Tudor Tailor for books, patterns, supplies, information, and inspiration!
Petticoats didn't disappear with the new century, though. They were definitely worn into the first few decades 17th century by common women. The women who came to Jamestown in Virginia in 1621 were provided some clothing by the Virginia Company, including one petticoat, one waistcoat, and two smocks. There is no mention of a separate pair of bodies, though, so it's my belief that they were given typical petticoats with attached supportive upperbodies.
So of course I had to have one! This will serve as my supportive layer for my forthcoming 1560s ensemble, and for a set of common woman's clothing for my interpretive work at early 17th century Virignia sites like Henricus and Jamestown. I have a 17th century event coming up next month, and I hope to have a low-neck smock, partlet, and waistcoat finished for that! Easy, right? ;-)
My petticoat is made of wool and has two layers of heavyweight, coarse linen padstitched together for the bodies, then lined in linen--no boning! Skirt was squeezed out of two yards of red wool flannel (yay piecing!) and bound in black wool tape.
Eyelets and skirt opening.
The skirt top edge is folded over and whipped to the bottom edge of the bodies, which have been completely finished by stitching the lining in.
More eyelets :)
A bit of the piecing, and the wool tape binding. I purposefully chose to do all of the stitching in unbleached linen thread.
A shot of the "guts". The seam allowance is stitched down with a herringbone stitch. I only did padstitching on the fronts, and then only on half of each side. I could have done more, but... meh!